All in Blog

Grilled Pineapple with Yogurt and Walnuts

A high protein breakfast or a satisfying dessert, Grilled Pineapple with Yogurt and Walnuts is hard to beat!  The natural sugar in the pineapple caramelizes into beautiful smoky grill marks, while the walnuts add crunch to the creamy Greek yogurt.  Grill a bunch of pineapple as part of your meal prep for the week and refrigerate.  This special breakfast can then be assembled quickly!

Serves: 1

Prep time: 5 minutes

Cooking time: 10 minutes

What (your ingredients):

½ teaspoon coconut oil

½ cup pineapple (sliced or in chunks)

1 container plain nonfat Greek yogurt (about 17 grams of protein)

2 tablespoons crushed walnuts

Dash of cinnamon

How (your directions):

Grease grill pan with coconut oil, and heat over medium heat.

Layer pineapple slices onto hot grill, and sear for 3-4 minutes on each side.

Plate grilled pineapple, then serve with Greek yogurt.

Sprinkle with walnuts and cinnamon.

Enjoy!

Why (the science):  Pineapple contains bromelain, an enzyme that helps us break down and digest protein.  Bromelain is also a powerful anti-inflammatory compound, so it can help with arthritis and indigestion.


Pasta Primavera

Pasta Primavera is a smart dish to encourage more vegetable intake, without feeling like you’re eating a bunch of vegetables😉 It’s a scrumptious sauce with lots and lots of fresh veggies, and I encourage you to use whatever you may have on hand.  Lentil pasta and cannellini beans up the protein significantly.  I serve this Pasta Primavera over fresh zucchini noodles to add even more vegetables and bulk to my pasta portion.

Serves: 4-6

Prep time: 10 minutes

Cooking time: 10 minutes

What (your ingredients):

1 tablespoon olive oil

1 red onion, finely diced

1 orange bell pepper, diced

1 head broccolette, diced

¼ teaspoon Italian seasoning

Pinch of paprika

Pinch of salt

2 handfuls kale, chopped

1 15-oz. can cannellini beans, drained and rinsed

1 jar marinara sauce (I used a rich tomato sauce with Barolo wine)

12 oz. lentil Sedanini pasta (or any short pasta shape)

3 zucchini, spiralized

How (your directions):

In a large skillet, heat olive oil over medium heat.  Add red onion, bell pepper, broccolette, Italian seasoning, paprika, and salt.  Stir and sauté for 5 minutes.

Add chopped kale and sauté for 2 minutes.

Stir in cannellini beans and marinara sauce.  Heat through while pasta cooks, about 5-6 minutes.

Drain pasta and add to primavera sauce.

In each pasta bowl, place several curls of spiralized zucchini.  Ladle pasta and primavera sauce over fresh zucchini noodles.

Enjoy!

Why (the science):  Lentil pasta is high in protein (13 grams protein per serving!) which makes it a nutritious way to enjoy pasta and reach satiety sooner than you would with a white pasta.


Anti-inflammatory Curry

When I’m feeling the aches of the flu or a bad cold, I crave a meal that can fight the inflammation in my body.  This Anti-Inflammatory Curry is quick and easy enough to make when you’re sick (yes, I know from experience) but is light and easy on the stomach, since it’s not spicy.  So often curries are heavy and fatty, but this curry is more like a broth.  Pairs perfectly with a side of brown rice!

Serves: 4

Prep time: 10 minutes

Cooking time: 30 minutes

What (your ingredients):

1 teaspoon coconut oil

2 bell peppers, medium diced

1 block extra-firm tofu, cubed

1 head broccoli, cut into florets

2 large carrots, diced

1 teaspoon fresh ginger, minced

2 tablespoons red curry paste

1 15-oz. can coconut milk

Brown rice to serve

How (your directions):

In a large skillet, heat coconut oil over medium heat.  Add bell peppers and tofu, then sauté for 5 minutes.

Add broccoli florets, diced carrots, and minced ginger.  Sauté for 5 minutes.

Add red curry paste and coconut milk and stir to combine.  Bring to a simmer, then cover and cook on low heat for 20 minutes.

Serve over brown rice, and salt to taste.

Enjoy!

Why (the science):  Curries make powerful anti-inflammatory meals because they so often include foods to reduce oxidative stress in the body.  Coconut oil, broccoli, turmeric, and ginger are all found in this recipe, which means this curry battles oxidation and inflammation in a variety of ways.

Cauliflower Alfredo with Peas

I served this “alfredo” to my husband without revealing the true ingredients of the sauce and he believed it was real (parmesan and cream laden) alfredo!  No sir, just a humble cauliflower cooked until tender and blended with garlic and onion powder 😊  Husbands and kids will be tricked alike with this wonderfully easy alfredo pasta!  A drizzle of good olive oil gilds the lily.

Serves: 4

Prep time: 5 minutes

Cooking time: 20 minutes

What (your ingredients):

I head cauliflower, roughly chopped

½ teaspoon garlic powder

½ teaspoon onion powder

½ teaspoon salt

¼ teaspoon red pepper flakes

4 oz. capellini pasta

¾ cup frozen peas

How (your directions):

Place cauliflower pieces into a large saucepan or pot and cover with water.  Bring to boil and cook for about 12 minutes, until the cauliflower is fork tender.  Tip: the cauliflower must be fork tender instead of al dente, so that it turns into a creamy sauce.

Meanwhile, boil salted water for pasta.

Ladle tender cauliflower into a high-speed mixer with about ¾ cup- 1 cup of cooking water.  Add garlic powder, onion powder, salt, and red pepper flakes.  Blend until smooth, about 30 seconds.

Add cauliflower alfredo to dried pan and heat on low.

Cook capellini in boiling salted water for 3 minutes.  Strain cooked pasta and add to cauliflower alfredo.  Mix to evenly distribute sauce.

Add frozen peas to pasta, cover with lid, and heat on low for 10-12 minutes.

Serve immediately with a drizzle of good extra virgin olive oil.

Enjoy!

Why (the science):  Cauliflower is a cruciferous vegetable, which means it provides powerful anticarcinogenic nutrients for our bodies.  What an incredibly versatile veggie, that it can pass as rice, pizza crust, and now alfredo sauce 😊


Pasta with Easy Mushroom Wine Sauce

Pasta with Easy Mushroom Wine Sauce is a dish that takes no more than 15-20 minutes to make!  The sauce is simple, but hearty and comforting.  The hardest part of this weeknight dinner is waiting for the water to boil 😊

Serves: 2

Prep time: 5 minutes

Cooking time: 10 minutes

What (your ingredients):

2 tablespoons olive oil

1 8-oz. package mushrooms, chopped

2 cloves garlic, minced

Pinch of salt

1 tablespoon flour or cornstarch

1/3 cup white wine or cava

1/3 cup water

Juice from ½ lemon

4 oz. pasta

Parsley, for garnishing

How (your directions):

Bring large pot of water to a boil with a spoonful of salt.

Meanwhile, heat olive oil in a medium skillet over medium heat.  Add mushrooms and sauté for 5 minutes.

When water is boiling, add pasta and cook according to package instructions.

Once mushrooms begin to brown, add garlic and a pinch of salt.  Sauté for 2 minutes.

Add flour or cornstarch to mushrooms and cook for 1 minute.  Then slowly deglaze pan with wine or cava.  Add water and lemon juice and allow to thicken, about 2 minutes.

Drain pasta and serve with a ladle of mushroom wine sauce.  Garnish with parsley.

Enjoy immediately!

Why (the science):  Mushrooms are a great source of phosphorus, a critical nutrient for bone health and strength!

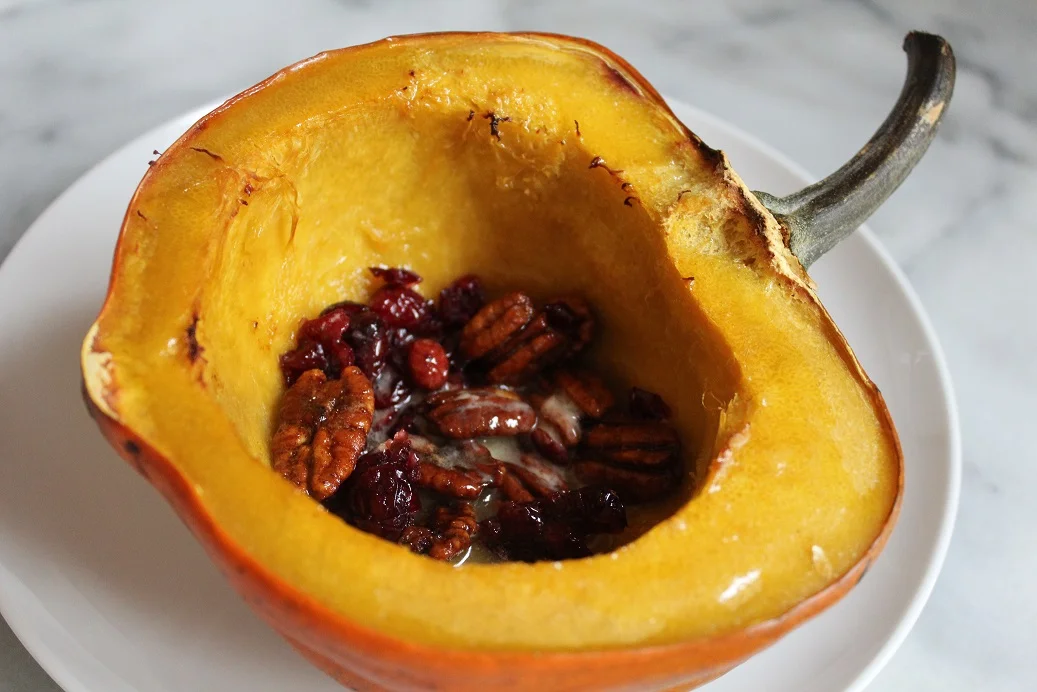
Roasted Acorn Squash with Sweet and Spicy Nuts

This recipe is inspired by a dear college friend who made this for me in college- a family recipe used for every Thanksgiving celebration.  Festive and comforting, yet delightfully easy, I love to enjoy this Roasted Acorn Squash for a yummy lunch on the weekends!  Use any candied sweet and spicy nut to make this side or entrée extra special, and be sure to dip each spoonful of squash into the melted butter in the center 😊

Serves: 2

Prep time: 5 minutes

Cooking time: 40 minutes

What (your ingredients):

1 acorn squash

2 tablespoons butter

4 tablespoons sweet and spicy nuts (Trader Joe’s and Whole Foods has a few options)

2 tablespoons dried cranberries

How (your directions):

Preheat oven to 400°F.  Line a baking sheet with parchment paper or silicone baking mat.

Cut acorn squash in half, remove seeds and stringy flesh from center, then roast on lined baking sheet for 40 minutes.

Once acorn squash has finished roasting, place one half in each bowl.

In the center of each half, add 1 tablespoon butter, 2 tablespoons sweet and spicy nuts (I used pecans), and 1 tablespoon cranberries.

Enjoy hot!

Why (the science):  One serving of acorn squash provides 145% of your daily vitamin A needs, which is critical for helping your eyes absorb light and for supporting cell growth in your heart and lungs!

Lemon Lavender Energy Balls |+ Video|

Many treats with lavender are often in form of shortbread cookies or pound cakes, but these Lemon Lavender Energy Balls have zero added sugar (or butter or flour)!  Bring 2-3 energy balls for an easy on-the-go snack.  Perfect for that afternoon energy slump 😊

Serves: 4-5 (Makes 14 balls)

Prep time: 10 minutes

Cooking time: 0 minutes

What (your ingredients):

1 cup raw cashews

1 cup dates

1 teaspoon culinary lavender

Zest and juice of 1 lemon

Coconut oil for hands

Desiccated coconut for rolling

How (your directions):

Blend cashews, dates, lavender, lemon zest, and lemon juice in food processor until it forms a ball.

Rub a small amount of coconut oil between your hands.  Pinch a tablespoon of dough into your hands, and roll into a ball.

Roll the ball into desiccated coconut.  Repeat with rest of dough.

Store in an airtight container for one week!

Why (the science):  Lavender has relaxing properties, found not only in breathing the aroma but also in its edible form!  These Lemon Lavender Energy Balls can help naturally relieve anxiety and stress.

Kale Chips made with the Microwave!

Crave a salty and crispy snack at 3 PM?  Friends about to drop by and need a lightning speed appetizer to munch on?  Homemade kale chips made in the microwave are ready to devour in only 5 minutes!  Get creative with the spices for fun flavored chips, or have your friends or kids choose their own spices.  Snacking can be healthy, fast, easy, and yummy 😊

Serves: 1

Prep time: 0

Cooking time: 5 minutes

What (your ingredients):

2 stalks of kale

1 teaspoon avocado oil or olive oil

Pinch of salt

How (your directions):

Tear curly kale into large pieces and discard the stalk.

Massage with oil to make sure kale pieces are thoroughly coated.  Then sprinkle with salt.

Tip: You could be adventurous and add a dash of your favorite seasonings-garlic powder, onion powder, paprika, cayenne, etc.

Distribute kale pieces onto plate, allowing a small amount of room between each piece.

Microwave 3 minutes.  After 3 minutes, if the kale is not a “chip” yet, continue to microwave, checking every 1 minute.  My chips took a total of 5 minutes to create a crispy chip.

Enjoy immediately!

Why (the science):  I hardly need to mention the health benefits of kale, since it has been a trending vegetable for a few years now!  But now enjoy kale as a crispy chip that only takes 5 minutes and is flavored to your liking 😊

Breakfast Butternut Squash Bowl |+Video|

Breakfast for dinner is one of life’s simplest pleasures, am I right?  This Breakfast Butternut Squash Bowl is full of protein and fiber to keep you full.  But more importantly, it’s packed with anti-inflammatory foods to combat disease caused by stress.  Now that’s a delicious bowl of food!

Serves: 4

Prep time: 15 minutes

Cooking time: 60 minutes

What (your ingredients):

1 butternut squash,

5 eggs

1 ½ cups rice, cooked (rice pictured is yellow because cooked with turmeric!)

1 15-oz. can black beans, rinsed

1 avocado

Hot sauce (optional)

Salt and pepper to taste

How (your directions):

Preheat oven to 400°F. 

Using a sharp knife, create slits in butternut squash before roasting. 

Place butternut squash onto a lined baking sheet, then roast in oven for 60 minutes.

Remove squash from oven and allow to cool while for 5 minutes.  Slice butternut squash in half, and remove seeds and strings from center.

Scramble eggs over medium-low heat until soft curds form.

Then assemble your bowls!

Spoon rice, black beans, and squash into each bowl.  Top with scrambled eggs and a few slices of avocado.

Season with hot sauce, salt, and pepper to taste.

Why (the science):  Known as the “3 Sisters” of Mesoamerican agriculture, rice, beans, and squash are staple everyday foods of Nicoya, Costa Rica- a Blue Zone with one of the longest living and healthiest communities in the world!

Easy Spaghetti Squash with Garlic-Infused Olive Oil | + Video |

It is so fun to twirl your fork through the long ribbons of a spaghetti squash.  This spaghetti squash recipe comes together quickly and requires only 5 ingredients!  Easy Spaghetti Squash with Garlic-Infused Olive Oil will become your favorite recipe for Italian Night at your home 😊

Serves: 2

Prep time: 15 minutes

Cooking time: 40 minutes

What (your ingredients):

1 spaghetti squash

2 tablespoons olive oil

1 clove garlic

Pinch red pepper flakes

Pinch dried oregano

Salt to taste

How (your directions):

Preheat oven to 375°F. 

Slice spaghetti squash in half lengthwise, then scoop out seeds and stringy center.  Tip: Don’t toss the seeds!  Watch this video to see how I easily separate the seeds from the flesh and roast them to perfection.

Place spaghetti squash cut side up on a baking sheet, then roast in oven for 40 minutes.

When squash is tender and a fork can easily pierce through the center, remove from oven and let rest 10 minutes.

During that time, heat olive oil over medium-low heat.  Thinly slice garlic clove and add to hot oil.  Allow to cook 1-2 minutes until garlic slices are slightly softened.

After the squash has cooled, use a fork to separate strands into spaghetti-like ribbons.

Spoon over the garlic and olive oil, then top with red pepper flakes, oregano, and salt.

Enjoy!

Why (the science):  Spaghetti squash, unlike pasta spaghetti, contain lutein and zeaxanthin which can help protect your eyesight as you age!

Shakshuka-Eggs Poached in a Tomato Stew

Shakshuka is the fancy name for a one-skillet dish of eggs poached in a tomato stew or sauce.  While shakshuka originated in North Africa, it is now a breakfast favorite in Israel.  While you can certainly wow your friends and family at a weekend breakfast or brunch, I prefer to make it as an easy weeknight dinner.  Shakshuka is warm and comforting at the end of a workday 😊  Serve with crusty bread, or my favorite way, over brown rice with a drizzle of good olive oil!

Serves: 4

Prep time: 10 minutes

Cooking time: 45 minutes

What (your ingredients):

1 tablespoon avocado oil

2 shallots, thinly sliced

1 zucchini, diced small

1 yellow squash, diced small

1 bell pepper, diced small

5-6 Roma tomatoes, diced small

1 head of kale, roughly chopped

 Salt

1 clove garlic, minced

1 teaspoon cumin

1 15-oz. can tomato sauce

½ cup water

4 eggs

How (your directions):

In a medium cast-iron skillet, heat oil over medium heat.  Add shallots and cook 3-4 minutes until translucent.

Add diced zucchini, squash, pepper, tomatoes, kale, and salt.  Sauté for 5 minutes until vegetables begin to brown slightly.

Add garlic and cumin and sauté for 1 minute.

Add tomato sauce and ½ cup water, then simmer for 10-15 minutes.

Using the back of a wooden spoon (or just a spoon or ladle), create four wells for the eggs.

Crack an egg carefully to keep the yolk intact and gently allow egg to slip into one of the wells.

Repeat for remaining three eggs.

Cover and allow to simmer until eggs are cooked to desired doneness (about 10 minutes).

Serve hot over brown rice with a drizzle of good olive oil and a sprinkle of salt!

Why (the science):  You may know that tomatoes are rich in lycopene, which is protective against prostate cancer, but did you know that the more processed the tomato is, the more lycopene there is?  Canned tomato sauce and tomato paste have a higher lycopene content than raw tomatoes!

Easy Tomato and Bell Pepper Pasta Sauce

This Easy Tomato and Bell Pepper Pasta Sauce is seriously the easiest and quickest pasta sauce ever.  Chop some tomatoes and bell peppers, simmer, add a punch of flavor with pesto and-BOOM!-dinner is ready!  Yep, that’s all it takes to make a dinner that doubles as a hot or cold pasta salad to take to work/school for lunch during the rest of the week 😊

Serves: 6

Prep time: 5 minutes

Cooking time: 25 minutes

What (your ingredients):

1 lb. short pasta

2 cups tomatoes, roughly chopped (I used yellow/red/orange cherry tomatoes and orange heirloom tomatoes)

1 yellow pepper, roughly chopped

1 orange pepper, roughly chopped

½ cup water

Pinch of salt

1 tablespoon pesto

How (your directions):

Bring a pot of water to a boil and salt to the salinity of the ocean (this ensures flavorful cooked pasta).  Cook pasta according to pasta directions, then drain and set aside.

In a large saucepan, add tomatoes, peppers, a pinch of salt, and the ½ cup of water. 

Bring to a boil, then cover and simmer for 20 minutes.

Remove lid and reduce liquid slightly for 5 minutes.

Transfer sauce to blender and add pesto.  Blend on high until smooth, about 30 seconds.

Pour sauce back into the saucepan and mix pasta into sauce over low heat, to finish heating through.

Serve immediately!  Also delicious cold for lunch 😊

Why (the science):  Bell peppers are full of vitamin C, A, and folate!  Not to mention, this Easy Tomato and Bell Pepper Pasta Sauce has ZERO sugar, a characteristic hard to find in most store-bought pasta sauces.


Strawberry Pepper Gazpacho

Strawberry Pepper Gazpacho is sweet with a kick!  The strawberries balance the spiciness of the jalapeno, and the peppers add body and texture to this bountiful summer soup.  I poured my gazpacho into two clean pasta sauce jars, making these the perfect grab-and-go meals or afternoon snacks.  Because it can be enjoyed cold or room temperature, strawberry pepper gazpacho can be enjoyed anywhere, be that work, school, outdoor festival, or picnic!

Serves: 2

Prep time: 5 minutes

Cooking time: 0 minutes

What (your ingredients):

1 lb. strawberries, rinsed (keep the green stems on!)

1 yellow pepper

1 orange pepper

6-8 small tomatoes

1 jalapeno, veins and seeds removed

1 tablespoon white wine vinegar

How (your directions):

Place all ingredients in a high-speed blender or food processor and blend until almost smooth but leaving a little texture.

Serve immediately or keep in the fridge for 4 days.

Enjoy!

Why (the science):  With colors like orange, yellow, and red, this soup is truly overflowing with vitamin C and antioxidants 😊


*Recipe updated from Purple Carrot

Easy Summer Zucchini Soup | + Video |

This easy summer zucchini soup could be my favorite soup EVER!  It’s light, silky, bright, and refreshing.  Not to mention, the soup comes together so quickly, you can have dinner ready and on the table in 30 minutes.  Serve with a warm, crusty baguette on the side and enjoy 😊

Serves: 4

Prep time: 5 minutes

Cooking time: 25 minutes

What (your ingredients):

1 tsp. coconut oil

½ onion, roughly chopped

1 clove garlic, minced

2 zucchini, roughly chopped

3 cups vegetable broth (I used 1 tsp. bouillon and 3 cups water)

Juice of ½ lemon

How (your directions):

In a large Dutch oven or stockpot, heat coconut oil over medium heat. 

Add onion and sauté for 3-4 minutes.  add garlic and zucchini and sauté for an additional 3-4 minutes.

Add vegetable broth, bring to a boil, then lower heat to simmer.  Cover and simmer for 15 minutes.

Transfer to a high-speed blender and blend until smooth.  Add juice of ½ a lemon and serve immediately!

Why (the science):  Zucchini is rich in vitamin B6, which plays an important role in metabolism and cognitive development!  Who knew? 😉


Low Sugar Strawberry Smoothie | + Video |

When you have organic strawberries, you can blend them directly into this Low Sugar Strawberry Smoothie without removing the green stems- talk about a time-saver!  This chia seeds thicken the longer they sit in the smoothie, ensuring a thick and luscious drink.  No watered down or icy consistency here 😊

Serves: 1

Prep time: 5 minutes

Cooking time: 0

What (your ingredients):

1 cup organic strawberries

½ cup frozen banana

1 cup unsweetened almond milk

1 tablespoon chia seeds

How (your directions):

In a highspeed blender, blend strawberries, banana, and almond milk.

Pour into a cup, then stir in chia seeds.

Enjoy immediately, take on the go, or save for later!

Why (the science):  Chia seeds are fiber powerhouses, which means they slow the rate of digestion.  No sugar highs and crashes, just a slow release of refreshing energy!  This Low Sugar Strawberry Smoothie is also made with unsweetened almond milk instead of juice, which helps cut down on a lot of sugar, too.

Grilled Plum Salad with Walnuts and Aged Balsamic | + Video |

Serves: 2

Prep time: 5 minutes

Cooking time: 10 minutes

What (your ingredients):

3 plums

1 tablespoon olive oil

4 cups arugula

3 tablespoons raw walnut pieces

2 tablespoons aged balsamic vinegar or balsamic glaze

How (your directions):

Heat grill pan over medium heat.

Slice each plum in half and remove the stone (pit).  Using a pastry brush or baster, brush olive oil onto cut side of plum and place onto grill.

Repeat process with remaining plum halves.

Grill plums for 10 minutes.  If desired, flip plums and grill on second, rounded side for an additional 5 minutes.  This will yield a sweeter and softer grilled plum.

Plate arugula, then top with 3 grilled plum halves.  Sprinkle with walnuts and a drizzle of aged balsamic.

Enjoy immediately!

Why (the science):  Plums are a good source of soluble fiber, meaning that prunes slow the rate of digestion.  The result?  Feeling fuller, longer!


Virgin Plum Mojito

Refreshing, bright, and sweet, this plum mojito is best enjoyed on a hot summer day to cool off!  Easy on the stomach and good for digestion, this virgin drink would also make a great appetizer before any dinner 😊

Serves: 1

Prep time: 5 minutes

Cooking time: 0 minutes

What (your ingredients):

½ plum

6-8 sprigs of mint

Juice of ½ lime

½ teaspoon agave

2 cups sparkling water

Ice

How (your directions):

Slice ½ of a plum into 2 pieces and place in tall glass.  Add mint, lime juice, and agave. 

Using a muddler or the end of a wooden spoon or spatula, muddle the plum and mint until the plum’s juices are released and mint is slight broken apart (~30 seconds).

Add 3-4 cubes of ice and top with sparking water.

Enjoy your refreshing drink immediately!

Why (the science):  Fresh mint is great for digestion, as it fights inflammation in the stomach.  Don’t be afraid to chew on the mint leaves once you’ve sipped all of your mojito!


Marinated Summer Green Bean Salad

Serves: 4-6

Prep time: 10 minutes

Cooking time: 4 hours of marinating

What (your ingredients):

1 lb. fresh summer green beans

1 lb. cherry tomatoes

1 tablespoon excellent extra virgin olive oil

½ tablespoon champagne white vinegar

1 teaspoon Dijon mustard (or a spicy brown mustard works well too)

1 teaspoon sugar

¼ teaspoon salt

¼ teaspoon freshly cracked pepper

How (your directions):

In a large pot, bring 5 cups of water to a boil with a pinch of salt.  Place fresh green beans into boiling water and set a timer for 5 minutes.

Meanwhile, fill a large bowl with ice and cold water and set aside.  Once beans are cooked, immediately transfer to the ice bath (blanching stops the cooking process and prevents the bright green color from fading or changing to a greyish-olive color).

While the beans sit in the ice bath, prepare the marinade.

In a large serving bowl, combine olive oil, champagne white vinegar, mustard, sugar, salt, and pepper.  Whisk until combined.

Slice the cherry tomatoes in half and place in marinade.

Using tongs, transfer the green beans to the bowl with the tomatoes and toss until well combined and the marinade has coated each vegetable.

Cover bowl with plastic wrap and refrigerate for at least 4 hours.

Serve cold or room temperature as a side to your favorite summer entrée!

Why (the science):  Green beans are an excellent source of vitamin K, one of the fat-soluble vitamins, and is important for proper blood clotting.  Each cup of green beans provides more than 20% of your daily vitamin K needs!

Red Velvet Overnight Oats | + Video |

You can indulge in dessert for breakfast with these overnight oats, which just happen to be vegan, gluten-free, dairy-free, added sugar-free! The secret to that beautiful vibrant color is not food coloring, but rather a simple red beet.  Red Velvet Overnight Oats are meant to be the easiest grab-an-go breakfast for busy people, but they could easily be enjoyed between 2 people at the end of a long day for dessert 😉

Serves: 1

Prep time: 10 minutes

Cooking time: 4 hours or overnight

What (your ingredients):

1 medium beet, raw

1 cup unsweetened almond milk

1 heaping tablespoon cacao powder (or unsweetened cocoa powder)

1 heaping tablespoon unsweetened shredded coconut

2 dates, pits removed

1 teaspoon vanilla extract

½ cup oats

1 tablespoon chia seeds

How (your directions):

Wash and peel the raw beet, then roughly cut into cubes.

To a high-speed blender, add the beet, almond milk, cacao powder, coconut, dates, and vanilla.

Blend on high for 30-60 seconds until smooth.

In a glass container, combine oats and chia seeds.  Pour the red velvet beet mixture over the oats and chia seeds and stir until well combined.

Refrigerate overnight, or for at least 4 hours to allow the oats to soften and the mixture to firm up into a pudding-like consistency.

Top with walnut pieces, more shredded coconut, or even cacao nibs for added crunch,

Enjoy your dessert for breakfast!

Why (the science):  Beets are high in nitric oxide, which helps optimize performance for athletes!  This recipe gets you one step closer to improving your exercise game with the assist from beets 😊


Easy Tofu Chicken Salad (Vegan)

I’ve cracked the code on the world’s easiest and most delicious vegan chicken salad with my tofu version!  Too simple not to try 😉 Perfect on toasted seeded bread or spooned into lettuce cups!

Serves: 3-4

Prep time: 10 minutes

Cooking time: 20 minutes

What (your ingredients):

1 14.oz package extra firm tofu

1 tablespoon soy sauce (or coconut aminos to make vegan)

½ vegetable bouillon cube

Dash of dried thyme

Dash of dried marjoram

¼ cup water

3 tablespoons vegan mayonnaise

3-4 small celery sticks with leaves, finely diced

¼ teaspoon cracked black pepper

How (your directions):

Preheat oven to 400 °F.  Line a baking sheet with a silicone mat or parchment paper.  Hint: the silicone mat or parchment paper is crucial for preventing the tofu from sticking to the baking sheet, as this recipe is oil-free.

Remove tofu from packaging and drain water.

Place tofu on plate lined with paper towels, then cover with paper towels and place a large pan on top of the tofu to squeeze out the water.  Allow tofu to be pressed for 5 minutes.

Meanwhile, assemble the sauce by combining the soy sauce or aminos, bouillon, thyme, marjoram, and water in a small bowl.  Hint: heat in microwave of over stove as necessary to allow for bouillon dissolve into the mixture.

Remove pan and paper towels from tofu and slice tofu into 8 slices.  Press with additional paper towels briefly by blotting off excess water.

Dunk each tofu slice into the sauce, turning so that the sauce coats each side, then place on baking sheet.  Repeat with all tofu slices.

Pour remaining sauce evenly over each tofu slice and bake for 20 minutes.

Remove tofu from oven and allow to cool.

In a medium-size bowl, combine mayonnaise and celery. 

When the tofu has cooled, chop into small pieces and mix evenly with the celery and mayo, then season with pepper.

Cover bowl with plastic wrap and refrigerate for at least 2 hours.

Enjoy on whole grain bread or spoon into lettuce wraps!

Why (the science):  Tofu is a lean vegetarian source of protein with no saturated fat, yet one serving provides 20% of our calcium for the day!